


TRACY® Interconnect Light Panel

Mounting Bracket

Connector socket

Screw Sockets

Power cable (24 VDC)(Indoor or Outdoor type)

Link cable (24 VDC)(Outdoor type)

Countersunk screwMAX head diameter 7 mm(Not included)

Raw plug (Not included)
![]()
CAUTION:
Make sure there is NO electrical connection between light panels and other electrically conductive elements e.g. grounded metal parts:
USE ONLY countersunk screws – MAX head diameter 7 mm.
DO NOT tighten bracket screws more, than they can still be moved sideways by hand.
NOTE: For 1800 mm panels: add centered bracket*


![]()
DO NOT hammer or force the light panelsonto the mounting brackets.

![]()
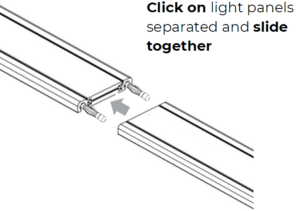
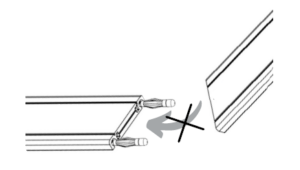
CAUTION:
Avoid bending connector pins; ONLY slidpanels
together!

![]()
CAUTION:
Observe POLARITY when connecting panels!
Polarity is marked the TRACY® Light Panels.
